I use three different VPN connections in my laptop: OpenConnect, OpenVPN and PPTP. I like these connections to be managed by NetworkManager and not by third parties
The first one (OpenConnect) is compatible with Cisco AnyConnect: http://www.infradead.org/openconnect/
The second one (OpenVPN) is compatible with pfSense: https://openvpn.net/
The third one is used to connect to a Point-to-Point Windows server: http://pptpclient.sourceforge.net/
After some updates in Slackware-current and KDE5, the connections stopped working. These are the steps I followed to have the connections up and running
OpenConnect:
I repackaged openconnect from https://www.slackbuilds.org/repository/14.2/network/openconnect/ and used the same NetworkManager-openconnect package for 14.2 from https://www.slackbuilds.org/repository/14.2/network/NetworkManager-openconnect/
I also found a Plasma 5 NetworkManager package at https://github.com/philipvdh/slackbuilds/tree/master/plasma5-nm-openconnect (from rworkman) by searching on Google for plasma5-nm-openconnect and followed the .info file in there to download the latest version of the package from https://github.com/KDE/plasma-nm/releases which matched with the Plasma packages (5.12.4). This last step did the trick for OpenConnect
The alternative would be to download and run the Cisco AnyConnect native client for Linux
OpenVPN:
I repackaged openvpn from https://ftp.osuosl.org/pub/slackware/slackware64-current/source/n/openvpn/ and used the NetworkManager-openvpn SlackBuilds script from https://www.slackbuilds.org/repository/14.2/network/NetworkManager-openvpn/ which worked fine, but I changed the tar.xz file to be the latest (1.8.2) and used the package from https://download.gnome.org/sources/NetworkManager-openvpn/1.8/NetworkManager-openvpn-1.8.2.tar.xz
The plasma5-nm-5.12.4 package from alienBOB worked perfectly for this connection
I imported the ovpn file that I have saved and used before
PPTP:
I repackaged pptp from https://www.slackbuilds.org/repository/14.2/network/pptp/using the latest version (1.10.0) from https://sourceforge.net/projects/pptpclient/files/ and used the NetworkManager-pptp SlackBuilds script from https://www.slackbuilds.org/repository/14.2/network/NetworkManager-pptp/ which worked fine, but I changed the tar.xz file to be the latest (1.2.6) and used the package from http://ftp.gnome.org/pub/GNOME/sources/NetworkManager-pptp/1.2/NetworkManager-pptp-1.2.6.tar.xz
The main part is to click on "Advanced..." and select only "MSCHAP" and "MSCHAPv2" under "Allow following authentication methods:" and "Use MPPE Encryption" with "Crypto: Any"
Regards,
F. Bobbio C.
Saturday, April 21, 2018
Sunday, March 18, 2018
Remmina RDP Issue
Remmina allows to connect to computers via different protocols (NX, RDP, SFTP, SSH, VNC and even XDMCP). Microsoft Windows allows remote control of a computer via RDP (Remote Desktop Protocol). Some Windows Updates in March, 2018 may break connectivity via Remmina, which uses FreeRDP to connect to Microsoft Windows machines. This is not an issue with FreeRDP, but with some implementation or modification on Microsoft's side, which tries to only allow machines within the domain to use RDP to communicate with each other.
There is a simple fix for this. Follow these steps:
Microsoft Windows:
1) Connect to the Microsoft Windows machine via RDP from another Microsoft Windows machine using "Remote Desktop Connection" by typing mstsc in the "Start" menu and typing either the computer name or its IP address. Use proper credentials
2) Right click on "Computer", "My PC" or "This PC" and click on "Properties"
3) Click on "Change settings"
4) Click on the "Remote" tab
5) Uncheck the "Allow connections only from computers running Remote Desktop with Network Level Authentication (recommended)"
6) Open "Services" by typing services.msc in the "Start" menu
7) Restart "Remote Desktop Services" by right clicking on it and clicking on "Restart"
Note: This last step will disconnect the RDP session
8) Attempt connection to machine again after 15 to 30 seconds
Remmina
1) Right click on the machine name from step 1) in the Microsoft Windows section
2) Click on "Edit"
3) Click on the "Advanced" tab
4) Change "Security" to "RDP"
Note: Option "NLA" for "Network Level Authentication" may not work, neither does option "Negotiate" (default)
5) Click on "Save"
6) Double click on machine name to attempt connection, which should be successful
Regards,
F. Bobbio C.
Wednesday, February 14, 2018
KUser In Slackware64-current Plasma 5 - KDE 5
One part of systems administration is adding, removing and modifying groups and users. These tasks can be accomplished via a terminal session using the following commands:
Adding a group: groupadd groupname
Adding a user: useradd username
Adding a user to a group: usermod -aG groupname username
More information on how to add, remove and modify groups and users can be found here: https://www.tecmint.com/delete-remove-a-user-account-with-home-directory-in-linux/
In Slackware, I used KUser until KDE 4. KUser allowed me to manage groups and users graphically. KDE 5 does not have KUser installed. I downloaded KUser from Slackware-current, copied three libraries needed by KUser to run (libkabc.so.4.14.38, libkldap.so.4.14.38 and libkresources.so.4.14.38) and created symbolic links. All libraries have to be in /usr/lib64
The dynamic links I created were:
libkabc.so.4 as a symbolic link to libkabc.so.4.14.38
libkabc.so as a symbolic link to libkabc.so.4
libkldap.so.4 as a symbolic link to libkldap.so.4.14.38
libkldap.so as a symbolic link to libkldap.so.4
libkresources.so.4 as a symbolic link to libkresources.so.4.14.38
libkresources.so as a symbolic link to libkresources.so.4
Regards,
F. Bobbio C.
Friday, February 2, 2018
Plasma 5 - KDE5 In Slackware64-current
Technology changes constantly, and as such, we need to adapt. One of those changes, in my field of work, is the Graphical User Interface (GUI). In Linux, my OS of choice, I use KDE. Slackware-current comes with KDE 4.14.3 installed. KDE 5 has been around for a while, though, so I decided to "bite the bullet" and installed on my Slackware-current system, using the instructions on https://slackware.nl/alien-kde/current/latest/README
I took a different approach, since I still consider myself a "novice" in the Linux world, even though I have been using it for quite a while, due to the fact that I am constantly learning something new. The steps I took were:
00) Take a screenshot of your whole screen, especially if you are using specific icons on the "Panel", since you will need to dock those icons after this whole procedure
01) rsync -Hav --exclude=x86 rsync://slackware.nl/mirrors/alien-kde/current/5/ 5/
02) telinit 3 would not work for me, since /etc/inittab was set to id:4:initdefault:
03) Modified /etc/inittab to id:3:initdefault:
04) Rebooted
05) slackpkg remove kde
06) cd to the location of the folder where you "rsynced" 5 in step 01)
07) upgradepkg --reinstall --install-new x86_64/deps/*.t?z
08) upgradepkg --reinstall --install-new x86_64/deps/telepathy/*.t?z
09) upgradepkg --reinstall --install-new x86_64/kde/*/*.t?z
10) find /etc/ -name "*.new"
11) slackpkg new-config
12) Reboot
13) xwmconfig 'xinitrc.plasma' as your desktop session
14) Modify /etc/inittab to id:4:initdefault:
15) startx
16) Dock any icons you may need (see step 00)
17) Change settings for keyboard layout, etc.
18) Enabled multiple monitors (http://conoacum.blogspot.com/2018/02/multiple-monitors-in-slackware-current.html)
Regards,
F. Bobbio C.
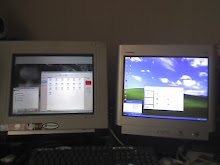
Multiple Monitors In Slackware64-current
Update 12-26-2019: I am using a USB 3.0 Dell D3100 docking station with 3 monitors. These are the new files I use with the Intel driver and with the NVIDIA driver:
Intel:
xrandr --listproviders --setprovideroutputsource 1 0 --setprovideroutputsource 2 0 --setprovideroutputsource 3 0
xrandr --output DVI-I-3-3 --auto --output DVI-I-2-2 --auto --output DVI-I-1-1 --auto
xrandr --output DVI-I-3-3 --pos 0x0 --output DVI-I-2-2 --pos 1920x0 --primary --output DVI-I-1-1 --pos 3840x0 --output eDP-1 --pos 5760x0
NVIDIA:
xrandr --listproviders --setprovideroutputsource 1 0 --setprovideroutputsource 2 0 --setprovideroutputsource 3 0
xrandr --output DVI-I-4-3 --auto --output DVI-I-3-2 --auto --output DVI-I-2-1 --auto
xrandr --output DVI-I-4-3 --pos 0x0 --output DVI-I-3-2 --pos 1920x0 --primary --output DVI-I-2-1 --pos 3840x0 --output eDP-1-1 --pos 5760x0
I use a Toshiba Satellite S55 laptop for personal and sometimes work related tasks. The laptop has an HDMI port which works fine when I plug in an external monitor/LCD TV. At work I sometimes need the extra space and do not have a big TV that I can plug into it at all. I purchased a USB 3.0 Lenovo ThinkPad docking station, which features two DVI ports, which I use with a DVI to VGA converter and a DVI to HDMI converter to two HP w2338h LCDs. Since this docking station is based on the DisplayLink chipset, I downloaded and installed the DisplayLink drivers using alienBOB's excellent wiki for it:
https://docs.slackware.com/howtos:hardware:displaylink
I will not repeat what he already mentions on the wiki, since the instructions are self explanatory and spot-on
I also created a shell script that I use to setup the monitors properly that I run when I am at work, since I do not use the same docking station at home. The proper --output will be displayed when running xrandr with the docking station plugged in. The script is as follows:
xrandr --listproviders
xrandr --setprovideroutputsource 1 0
xrandr --setprovideroutputsource 2 0
xrandr --output DVI-I-1-1 --auto *** Change DVI-I-1-1 to proper output
xrandr --output DVI-I-2-2 --auto *** Change DVI-I-2-2 to proper output
xrandr --output DVI-I-1-1 --pos 1920x0 *** Change DVI-I-1-1 to proper output. This is the center monitor (1920x1080)
xrandr --output DVI-I-2-2 --pos 0x0 *** Change DVI-I-2-2 to proper output. This is the monitor on the left (1920x1080)
xrandr --output eDP1 --pos 3840x312 *** Change eDP1 to proper output. This is the built-in laptop monitor, on the right (1366x768)
Save it to a proper location (monitors.sh), make it executable (chmod +x monitors.sh) and run it whenever you plug in the USB 3.0 docking station (sh monitors.sh)
I have tested this setup on Slackware 14.0, 14,1, 14.2 and Slackware-current, even with KDE5, without any issues
Regards,
F. Bobbio C.
Thursday, January 18, 2018
TightVNC En Slackware64-current
Para algunos usuarios es difícil la transición de Microsoft Windows a Linux debido a la interface gráfica ("Graphical User Interface", o "GUI"). El protocolo VNC permite acceder a máquinas de Linux en interface gráfica, en casos donde los paquetes de la interface gráfica hayan sido instalados. Uno de los paquetes para VNC es TightVNC, el cual usé para este propósito:
1) Descargué y desempaqueté tightvnc desde SlackBuilds: https://slackbuilds.org/repository/14.2/network/tightvnc/?search=tightvnc
2) Creé el archivo /etc/rc.d/rc.vncserver de acuerdo a https://www.linuxquestions.org/questions/slackware-14/start-vncserver-at-boot-as-non-root-user-403757/ cambiando las líneas 7, 8, 9 y 10
VNCSERVERS="1:NombreUsuario1 2:NombreUsuario2 3:NombreUsuario3" ### Usar los nombres de usuarios ya creados y que necesiten entrar via VNC ###
VNCSERVERARGS[1]="-geometry 1366x768"
VNCSERVERARGS[2]="-geometry 1920x1080"
VNCSERVERARGS[3]="-geometry 1920x1080"
3) Cambié los permisos de ejecución (chmod +x /etc/rc.d/rc.vncserver) e ingresé dos entradas en /etc/rc.d/rc.local para iniciarlo:
cd /etc/rc.d
./rc.vncserver start
4) Ingresé como cada usuario y se creó el archivo xstartup en el directorio oculto vnc en el "hogar" de cada usuario, el cual tuve que modificar:
#!/bin/sh
xrdb $HOME/.Xresources
xsetroot -solid grey
startkde & ### Esta fue la línea que cambié ###
5) Modifiqué el archivo /usr/bin/vncserver, línea 37
De $fontPath = 'unix/:7100'; a $fontPath = "/usr/share/fonts/misc/";
6) Ejecuté rc.vncserver start
¡Listo! Ahora los usuarios pueden conectarse usando VNC
Saludos,
F. Bobbio C.
Wednesday, January 3, 2018
TeamViewer 13 En Slackware64-current
Actualización 06-23-2018: Ya existe un SlackBuild para instalar TeamViewer en Slackware64-current
TeamViewer es un programa de control remoto que se puede instalar en Windows, macOS y hasta en Linux. Hasta hace poco, la instalación en Slackware requería usar wine (winehq.com), que no es un emulador, pero permite ejecutar ciertas aplicaciones de Windows en Linux. El usar wine es un proceso a veces tedioso, puesto que no todas las aplicaciones pueden ejecutarse en la misma versión de wine
Hace unos días vi que existía TeamViewer 13, pero que no había instalador para Slackware. Según la página de descarga de TeamViewer 13 (https://www.teamviewer.com/en/download/linux/), los requerimientos básicos son al menos Qt 5.2, Kernel 2.6.27 y GLIBC 2.17
La versión de Slackware-current del 03 de enero del 2018 tiene kernel 4.9.67 y glibc 2.26, pero solamente qt4, por lo cual primero intenté instalar qt5 desde https://download.qt.io/archive/qt/ usando el archivo .run dentro de 5.10, pero luego de instalarlo en /opt, TeamViewer aún no cargaba. Se me ocurrió entonces descargar e instalar los paquetes de qt5 y qt5-webkit desde la página de Eric Hameleers (también conocido como alienBOB), el cual tiene los instaladores reempaquetados: http://www.slackware.com/~alien/slackbuilds/
Luego de instalar ambos paquetes, instalé teamviewer usando el paquete x86 64bits (tar.xz) de https://www.teamviewer.com/en/download/linux/ y aún así no cargaba TeamViewer. El paso final fue agregar dos líneas a /etc/rc.d/rc.local que es el archivo que ejecuta scripts que uno desea cargar al iniciar Slackware. Las dos líneas fueron:
cd /etc/init.d
./teamviewerd start
Luego de reiniciar mi portátil, TeamViewer pudo iniciar sin problema alguno. Espero les sirva
Saludos,
F. Bobbio C.
Subscribe to:
Posts (Atom)